A Developer's Guide to Building MCP Servers
The Model Context Protocol (MCP) is rapidly emerging as a foundational open-source standard for connecting large language models (LLMs) with external tools and data sources. By creating a universal language for AI interactions, MCP eliminates the need for bespoke, one-off integrations, allowing developers to build scalable, secure, and context-aware AI applications. While pre-built servers for popular services exist, the true power of the protocol is unlocked when developers create custom servers tailored to their specific data, APIs, and workflows.
This guide provides a comprehensive, step-by-step walkthrough for developers on how to build, test, and deploy their own MCP servers. We will cover the core concepts, the development process using the official Python SDK, and how to connect and utilize these servers with a client.
Understanding the Core Concepts of MCP Servers
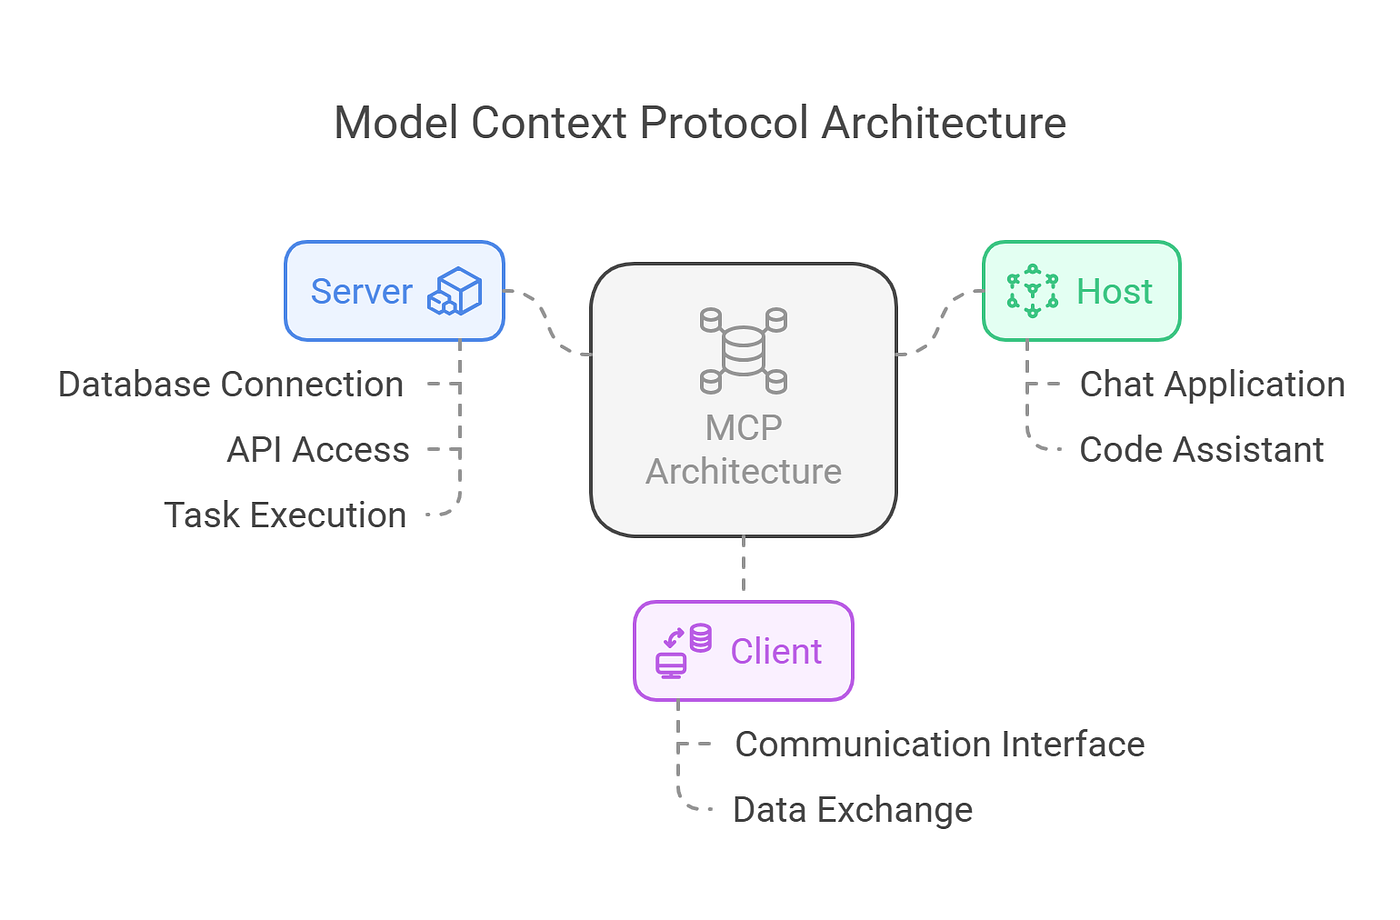
Before diving into the code, it's crucial to understand the fundamental components of the MCP architecture. The protocol operates on a client-server model where an AI application (the client) communicates with a lightweight program (the server) that exposes specific capabilities.
MCP servers can provide three main types of functionalities:
- Tools: These are functions that an LLM can call to perform actions, such as querying a database, calling a third-party API, or interacting with a file system. This is the most common use case for custom servers.
- Resources: These represent file-like data that clients can read. This could be anything from API responses to the contents of a local document, providing the LLM with necessary context.
- Prompts: These are pre-defined templates that guide users or the LLM in accomplishing specific, multi-step tasks.
Communication between clients and servers is handled via JSON-RPC, a lightweight and language-agnostic remote procedure call protocol. This ensures that a server written in Python can seamlessly communicate with a client written in TypeScript, fostering a truly interoperable ecosystem.
Step-by-Step Guide to Building a Python MCP Server
We will build a simple yet practical weather server that connects to the public National Weather Service (NWS) API. This server will expose two tools: one to get the weather forecast for a specific location and another to retrieve active weather alerts for a U.S. state. The official MCP documentation provides an excellent foundation for this process.
1. Setting Up Your Development Environment
A clean and properly configured environment is the first step. We'll use uv, a fast Python package installer and resolver from Astral, to manage our project.
Prerequisites:
- Python 3.10 or higher
- Familiarity with Python and asynchronous programming (
async/await)
First, install uv. On macOS or Linux, you can use the following command (for Windows, see the official uv installation guide):
bashcurl -LsSf https://astral.sh/uv/install.sh | sh
Restart your terminal after installation. Now, create your project directory and set up a virtual environment:
bash# Create and navigate into your project directory
uv init mcp-weather-server
cd mcp-weather-server

# Create and activate the virtual environment
uv venv
source .venv/bin/activate

# Install the necessary packages
uv add "mcp[cli]" httpx

# Create your server file
touch weather_server.py
We've installed the mcp package with the [cli] extra for command-line utilities and httpx for making asynchronous HTTP requests to the weather API.
2. Writing the Server Code
Now, open weather_server.py in your editor. We will build the server in several logical parts: imports and initialization, helper functions, tool implementation, and the main execution block.
Imports and Initialization
The FastMCP class from the MCP SDK makes it incredibly easy to define tools using Python type hints and docstrings, which are automatically converted into the required MCP schema.
pythonimport httpx
from typing import Any, Dict, List
from mcp.server.fastmcp import FastMCP

# Initialize the FastMCP server with a unique name
mcp = FastMCP("weather")

# Constants for the NWS API
NWS_API_BASE = "https://api.weather.gov"
USER_AGENT = "mcp-weather-server/1.0 (dev.example.com)"
Helper Functions for API Interaction
To keep our tool logic clean, we'll create helper functions to handle requests to the NWS API and format the responses.
pythonasync def make_nws_request(url: str) -> Dict[str, Any] | None:
    """Makes a request to the NWS API with proper headers and error handling."""
    headers = {"User-Agent": USER_AGENT, "Accept": "application/geo+json"}
    async with httpx.AsyncClient() as client:
        try:
            response = await client.get(url, headers=headers, timeout=30.0)
            response.raise_for_status()
            return response.json()
        except httpx.HTTPStatusError as e:
            print(f"HTTP error occurred: {e}")
            return None
        except Exception as e:
            print(f"An unexpected error occurred: {e}")
            return None

def format_alert(feature: Dict[str, Any]) -> str:
    """Formats a single weather alert into a readable string."""
    props = feature.get("properties", {})
    return f"""
Event: {props.get('event', 'Unknown')}
Area: {props.get('areaDesc', 'Unknown')}
Severity: {props.get('severity', 'Unknown')}
Description: {props.get('description', 'No description')}
Instructions: {props.get('instruction', 'None')}
"""
Implementing the Tools
This is the core of our server. We use the @mcp.tool() decorator to register our functions as callable tools. The function signature, type hints, and docstring are used to generate the tool's definition for the LLM.
python@mcp.tool()
async def get_forecast(latitude: float, longitude: float) -> str:
    """
    Get the weather forecast for a specific location.
    Args:
        latitude: The latitude of the location.
        longitude: The longitude of the location.
    """
    points_url = f"{NWS_API_BASE}/points/{latitude},{longitude}"
    points_data = await make_nws_request(points_url)
    if not points_data:
        return "Unable to fetch location data to get forecast."

    forecast_url = points_data.get("properties", {}).get("forecast")
    if not forecast_url:
        return "Could not resolve forecast endpoint from location."

    forecast_data = await make_nws_request(forecast_url)
    if not forecast_data:
        return "Unable to fetch detailed forecast."

    periods = forecast_data.get("properties", {}).get("periods", [])
    if not periods:
        return "No forecast periods found."

    forecasts = []
    for period in periods[:5]: # Get the next 5 periods (e.g., today, tonight)
        forecast_str = (
            f"{period['name']}: {period['detailedForecast']}"
        )
        forecasts.append(forecast_str)

    return "\\n\\n".join(forecasts)

@mcp.tool()
async def get_alerts(state: str) -> str:
    """
    Get active weather alerts for a two-letter US state code.
    Args:
        state: The two-letter US state code (e.g., CA, TX, NY).
    """
    url = f"{NWS_API_BASE}/alerts/active/area/{state.upper()}"
    data = await make_nws_request(url)

    if not data or "features" not in data:
        return "Unable to fetch alerts or no alerts found."

    if not data["features"]:
        return f"No active weather alerts found for {state.upper()}."

    alerts = [format_alert(feature) for feature in data["features"]]
    return "\\n\\n---\\n\\n".join(alerts)
Running the Server
Finally, add the main execution block to start the server. We'll configure it to run over stdio, which is the standard for local MCP server communication.
pythonif __name__ == "__main__":
    # This will start the server and listen for JSON-RPC messages on stdio
    mcp.run(transport='stdio')
3. Running and Testing Your Server Locally
You can run your server directly from the command line to ensure there are no syntax errors:
bashuv run python weather_server.py
The server will start and wait for a client to connect. To properly test it, you need an MCP client. While you can build your own, using an existing client is the fastest way to get started.

Connecting and Using Your Server with a Client
Once your server is built, you need a way for an LLM to interact with it. This is where MCP clients come in. Clients are applications that manage the connection to servers and facilitate the conversation between the user, the LLM, and the tools.
While clients like Claude Desktop or Cursor are popular choices, they often require local configuration files. A more flexible and powerful option for developers and users alike is Jenova, the first AI agent built specifically for the MCP ecosystem.
Jenova excels at connecting to remote MCP servers, making it incredibly easy to use tools without complex local setups. It is designed to understand user goals and execute multi-step agentic workflows by intelligently chaining together different tools. For instance, you could ask it to find a product online, generate a summary report, and then message a teammate—all through different MCP tools.
Jenova's multi-agent architecture is engineered for scalability and reliability, supporting a vast number of tools without the performance degradation seen in other clients. This makes it the most capable agent for integrating tools at scale. Furthermore, it works with any leading AI model (like GPT, Claude, or Gemini) and is available on desktop and mobile (iOS and Android), bringing the power of MCP to non-technical users for everyday tasks.
To make our local weather server accessible to a client like Jenova, we would typically deploy it to a cloud service and expose it via HTTP. Deployment platforms like Cloudflare Workers, AWS Lambda, or a simple virtual machine can be used. For remote servers, the transport method would change from stdio to http, and you would need to implement an authorization framework to secure your endpoint, as detailed in guides on deploying remote MCP servers.
Conclusion
Building a custom MCP server is a powerful way to extend the capabilities of AI models, connecting them to your unique data and services. By following a structured approach—setting up the environment, defining tools with clear schemas, and implementing the underlying logic—developers can create robust and useful servers. The process is streamlined by the official MCP SDKs, which handle the complexities of the JSON-RPC protocol.
As the ecosystem matures, the distinction between local and remote servers will become even more important. Tools like Jenova are leading the way by simplifying access to remote servers, enabling more sophisticated, scalable, and secure AI-powered workflows. By starting with a simple server like the one in this guide, you are taking the first step toward building the next generation of context-aware AI applications.